Hints for posting on new Forum.

Jurgen

0
Subscribed
Oct 23, 2009
685
140
43
www.chopard.org
The GT-Rider switch to a Wordpress supported forum brings some neat innovations and particularly a clean and easy to read design, perfectly adapted to all sorts of gear and displays.

Changes, however, also induce a learning curve, with more or less trial and errors to iron out system or human pecularities.

I thought that it would be useful to open a thread, not to ask questions or highlight what seems not to work (these posts already exist in the Forum) but to provide working hints about posting on the new GT-Rider board.

I would love to see others sharing some of their advices here… of course, most problems can be googled, but sometimes, a friend’s solution can avoid the trouble to show up first.

———————
This is my first contribution, called “Chrome, the worm in the Apple”.

The symptom of the worm was a text garbage (html code) scrambling my writings. I had uploaded a document (cleaned in Apple's TextEdit) with a Chrome browser on a MacBook. As this happened several times, I remembered an incompatibility between Mac and Chrome, when used, for instance, to access e-banking.

When I switched to Apple’s native Safari browser, the garbage disapeared and the text was clean.

So, Apple friends, if you experience this phenomena, stick to Safari.

(P.S. I can not confirm that this problem would not occur on the previous Forum; as it was the first time that I used the Apple/Chrome combination, and this “couple” might well generate headaches somewhere else, in some instances, Chrome is also incompatible with Windows, and Internet Explorer/Edge has to be used)

... and, sure enough, to post this thread, I forgot my own advice and used  Chrome first ... it scrambled my post again and I had to edit it!  :-(   :)
 

Jurgen

0
Subscribed
Oct 23, 2009
685
140
43
www.chopard.org
Adding an illustrated thread to the new GT-Rider Forum.

Fundamentally, adding texts and pictures to the new Wordpress Forum is not much different from my previous procedure. I will describe this workflow and highlight some differences, but, as I am not a geek for that matter, I can only share my own experiences. Others might have an easier solutions and a faster way to publish their write-ups.

Add Media Button”: the topic of adding pictures is discussed in another thread (Images - Resizing & adding to Topics). The question of the “Add Media Button” to upload pictures is also discussed there, but, until now I have never seen this button. It might show up on some pages only or face a Java problem (?). In my workflow, however, I do not use this button and can ignore the fact that It does not show up.

My posting workflow:

1. Image storage: I use and external hosting site, nothing changed from before as I already did this previously. Many are available from Picassa/Google to Flickr, Smugmug, Photo Bucket or whatever.

2.Picture size: For GT-Rider posting I upload the pictures to my hosting site in the corect size (max recommended 730 x 568 pixels , I had it previously sized to 750 pixels and it also worked). The GT-Rider site accepts a maximum file size of 200 KB. In any case it is worth to test how much compression the pictures support, as ‘lighter’ images will show up faster for the readers … a balance has to be found between compression and quality.

3.Resizing and compressing: I do these operations in “Lightroom”. I have not tried to upload pictures from a smartphone or camera directly to a host site (it works for instance with Google Photo), as I am shooting in RAW and want to remain in command as long as possible. People following my procedure need a software, external to the camera, for processing (there are many free options, some bundled with cameras). The resizing might even be handled by the host site before copying the link for another site. Free online resizing sites are also available.

4.Text writing: pictures are often illustrations for texts, and, as my English proficiency is not good enough, I need to prepare the longer texts on a word processor. I usually paste the final writing into a basic text editor to avoid the addition of annoying and often misinterpreted codes.

5.Inserting offline pictures: the links to my chosen pictures are “copy/pasted” (from the host site) at their final locations in the “offline” text. At this point, for the new forum, I have now an alternative to my previous system.

5A Previous and still working procedure: I insert the BBcode for image around the pictures. It is “left bracket img right bracket”url-to-the-chosen-picture”right bracket slash img left bracket” (in this text the brackets can not be shown as Wordpress would hide them, they are the square brackets).

When I upload the document to GT-Rider's Forum I do not see the pictures. They only show up, at once, when I publish the post. It is quick and nice … in the unlikely case that I made no mistake with the links. Otherwise I have to edit my text … no big burden, but some “fast” readers might have seen the mistakes.

(referring to my former post, using a Chrome browser on Apple did not allow me to insert pictures with the BBcodes. I had to switch to Safari to make it work)

5B New procedure: I only insert the pictures' URL,”copy/pasted” from the hosting site, at their final place (no BBcode), still in the word-processing offline document.

After uploading the write-up to the GT-Rider forum, and before publishing it, I cut and paste each URL from it’s position in the text to the “Insert/Image” button. It is straightforward … but takes a little more time, particularly for a large report. The advantage is that each picture directly shows up, can be evaluated, and, if needed, corrected before posting.
In conclusion, the former “bunch upload” still exists, with the inconvenience that the thread has to be published before being evaluated. The new system takes slightly more time but I enjoy the possibility to see the “final product” before posting it.

My workflow might not be convenient for everybody; it works for people needing an external word processor to prepare their write-up and for large quantities of pictures. Uploading all images at once, in the right sequence, and writing (or pasting) the text directly in place is another possibility.
 

Jurgen

0
Subscribed
Oct 23, 2009
685
140
43
www.chopard.org
Useless but good to have!

Using the “Insert/Image” button is an easy way to post pictures (from an external host) to the new GT-Rider Forum (see previous post). The straightforward process is to paste the picture’s URL in the “source” box and hit OK.

Some people might be usure, however, what to do with the next boxes, some might have tried to insert a title or a legend in the “image description” text box, and did not see anything appearing on the published post. To make the matter worse, a second text box seems to ask for another (similar) description and, in between, there are boxes to resize the pictures.

I will deal (to my best knowledge) with these additional information. First of all, to confirm that you can just ignore them and let the boxes blank. But then … why are they there? What is their purpose?

Let’s go through an example.

I will begin with the "dimension" (third line, after pasting the picture’s URL under “source”). If you follow the workflow described above, your image should already have the right size. For some reasons, however, you might want to change its published appearance (or you do not have the right size to begin with). Just introduce the pixel size that you want and keep the “constrain proportions”box ticked (unless you prefer a funny deformation of your artwork

You do not have to put both measures inside the boxes, one suffice for the software to calculate the other (in constrained proportions). As recommended, you could resize the width to 730 pixels, or make is shorter for a smaller image.

A word of caution! It is not optimal to resize a picture in a browser as the file size to download remains the same (large) and the image is only modified once loaded into the browser. It might just be a convenience, in an exceptional case.

This image has been resized to 500 pixels as an example

_FJC6349-Edit.jpg


The next box (last line) is the “image caption”. As an example, I uploaded the same picture in my “full posting size” and added a caption.

_FJC6349-Edit.jpg
Beautiful smile and intriguing weaving

If you write titles and captions as part of your text, and if you upload pictures to your external server in the right size, you do not need to worry about the “Image caption” and “dimension” boxes. But, they are there, nice to have … just in case. In addition, captions are attractive on pictures and might be useful, as I will show later on.

The last point (not least) is the second line labelled “image description”. Again you can just ignore it …but in my next post: “Alt” a way to go further! I will explain why some people might consider filling it in and how to do it.
 

Jurgen

0
Subscribed
Oct 23, 2009
685
140
43
www.chopard.org
“Alt”, a way to go further!

In my previous post I have discoursed about the usefulness of the attribute boxes when uploading a picture through the  “Insert/Image” button. The « dimension » box should be used with caution, and at best avoided, while the “image caption” might seem to duplicate the title or legend already written in the text. I will, however, give a hint, later on, why the captions also add value to a text.

_FJC6249-Edit.jpg
This Khmu girl can help me to promote GT-Rider

The “image description” box is a mean to populate an HTML/XHTML attribute (or tag) called “alt” (for alternative), in a website’s code. This text, written into the description box, does not show up when a page is displayed normally, with all its illustrations.

Only when, for some reasons, images are disabled, will this (picture) “alternative” text be rendered. In the past, this was done on purpose, on very slow connections. Nowadays, “screen reader” tools, used by visually impaired people, or just for convenience, use it. Despite the charitable concern to cater for these “readers”, few people might go through the burden to add these texts, just for that purpose.

There is, however, another “picture blind” category. Despite Google’s progress to recognise faces and some images, web crawlers (spiders) mostly rely on text to understand what they are indexing. The “alt text” will give them a clue.

In the secretive search engine algorithm world, it is difficult to assess how much a picture’s “alt text” will boost an already well-optimised site. There is, however, another very important and not so well known edge. More and more search engines index pictures, till now, they have to rely mostly on this “alt” text.

But, finally, what is the point to have an image indexed by an image crawler? People love pictures, when they are presented with relevant images, for instance by Google, they might click on them and … bingo, the site has one more (probably interested) visitor. The “alt” tag, filled in with a relevant description, can bring loads of additional hits to a site.

Another appreciable benefit is the help from “alternative text” when pictures disappear from a site (broken “src link”, it often happened to me). With an “alt tag” it is easier to define which picture is missing.

In conclusion, filling in the “image description”, when using the “Insert/Image” button, on the new WordPress Forum, is a productive addition for contributors keen to reach a larger audience, outside of the usual GT-Rider community.

In my next post, I will explain how I integrate this operation in my write-up workflow.
 

Jurgen

0
Subscribed
Oct 23, 2009
685
140
43
www.chopard.org
Reading the pictures.

In my last post I focused on the importance of filling in the “image description” box in order to provide an “alternative text” description to an illustration. This allows pictures scouting crawlers to index images and to provide a link back to the web pages where they originated; a little known, but efficient way to attract more visitors to a website.

I favor the “alt tag” option for most GT-Rider threads but, actually, it is primarily directed toward acquiring new visitors, outside from the existing readers community. Considering the additional sweat involved, it has to be checked, in each case, toward the expected benefices.

In order to be efficient, the “image description” has to be carefully crafted. A description of SEO keywording and procedure goes behind the scope of this post; the web is filled with advices for interested writers. I will just quote a short list from Google (1), which gives an interesting frame:

- Keep it simple

- Master the art of saying a lot with a little.

- Be descriptive yet succinct

- Be strategic with your descriptions.

- Consider the text surrounding the image

- Placing images with alt tags near relevant text will help create a coherent experience for non-visual users

- Utilize keywords to help your site rank better in search

- It’s a great strategy to use your site’s keywords in order to help your images rank

The optimal text would have about 8 words and never go over twenty. Stuffing keywords, repetitions and other dubious tricks are often contra-productive; crawlers are smart to sniff foul playing.

It is important to be true to the image; the “alt tag” should provide, in writing, useful information for the end user, similar to the picture’s content.

In my example, I have filled the “alt tag” with the sentence: “A girl wearing a traditional Tai Dam headgear (Hive Ethno fashion show, Luang Prabang).

If I wanted only to emphasize the Tai Dam headgear, I could drop the location.

The example’s caption, on purpose, is useless for an image replacement. It indicates my mood (beautiful, intriguing) but does not provide a clue about the image’s content.

_FJC6349-Edit.jpg
Beautiful smile and intriguing weaving.

To integrate the “caption” and “alt text” elements into my workflow (see my second post above), I have to use my new procedure (5B) that I introduced for the Gt-Rider WordPress Forum postings.

After preparing the whole text offline in a text editor, with the pictures URL linking to my external hosting site, positioned at their final place, I add, underneath, two more sentences:

a) the “alt” image description
b) the image caption

Before doing this, and because it is more work to craft the descriptions and put them in place, I consider, for each image, if a caption is needed and if I want to have this particular picture indexed (“alt text”).

Once the write-up is ready, I upload it to the GT-Rider Forum and, manually, add every image with the “Insert/edit image” button. It is straightforward, as this information is already in the text; I only have to “cut” and “paste” it inside the “insert” boxes.

There is, unfortunately, a small issue. It is not possible to let the “insert” window open while going back to the main text. As I have three information to add, I have to close it each time, cut another sentence and open the "edition" again (this time it is faster, as I can use the “pen icon” on top of the picture).

An alternative is to keep the original word-processing text open and to switch back and forth between the two windows, to handle the cut and past operation.
All this seems more complicated in writing than in reality, and I think that in many cases it would provide an edge to GT-Rider’s general interest postings.

If there is an easier procedure to accomplish this task, I would be happy to learn about it.
In another post, I will summarize and evaluate all the different texts, which could or should accompany online pictures.

(1) Google hints :
https://9clouds.com/2014/01/23/the-importance-of-alt-attributes-aka-alt-tags-or-alt-text/
 

DavidFL

0
Staff member
Subscribed
Jan 16, 2003
14,455
5,287
113
70
Chiang Khong
www.thegtrider.com
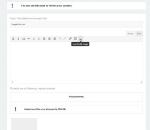
The insert image button looks like this

GTR-Image-Posting1.jpg


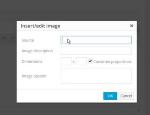
This opens up a pop up

GTR-Image-Posting2.jpg


to  insert the image URL
 

Attachments

  • GTR-Image-Posting1.jpg
    GTR-Image-Posting1.jpg
    27.7 KB · Views: 184
  • GTR-Image-Posting2.jpg
    GTR-Image-Posting2.jpg
    23.5 KB · Views: 152